Search This Blog

Showing posts with label instalation. Show all posts

Saturday, May 17, 2014

XenServer installation over iKVM and redirected ISO CD-ROM option in JViewer

I've had a problem using my XenServer on VMware Workstation. I needed instead to install it on my dedicated server i have. Some of my notes:
  • Enabled iKVM on the server: How to enable IPMI settings in BIOS on Tyan S8225 motherboard.
  • In BIOS make sure you have enabled the VGA graphic output and disabled the graphics output on the PCI-X bus (as per  the link above)
  • The XenServer installer was not able to recognize my AHCI disk driver so I needed to enable a regular 'Native IDE' driver in BIOS (see screen shots below)
  • Disable java security permission in Windows (search for 'configure java' under Windows menu)
  • Mount the ISO image from the JViewer (java iKVM from ASUS) restart the server and follow the installation instructions :)
  • At the beginning of installation you will see that the phase 'Loading /install.img' is taking very long time. Don't panic, watch the network card stats and wait for the installer to start. It can take even up to 10min.


References

http://www.davethijssen.nl/2013/07/install-citrix-xenserver-62-from-usb.html

Saturday, May 18, 2013

How to install Arista EOS on Virtualbox

The solid EOS architecture that makes Arista switches so powerful allow as well easy testing and experimenting. You don't need to buy any physical switch to get access to the CLI to play with it.

These links below are going to give you enough information how to deploy yours EOS-4.10.2-veos.vmdk switch image within Virtualbox or any other hypervisor. All what you need is to download 2 files (the EOS.vmdk and Aboot*.iso) and follow the steps.

vEOS and VirtualBox
VMWare Fusion Virtual Networks
Building a Virtual Lab with Arista vEOS and VirtualBox

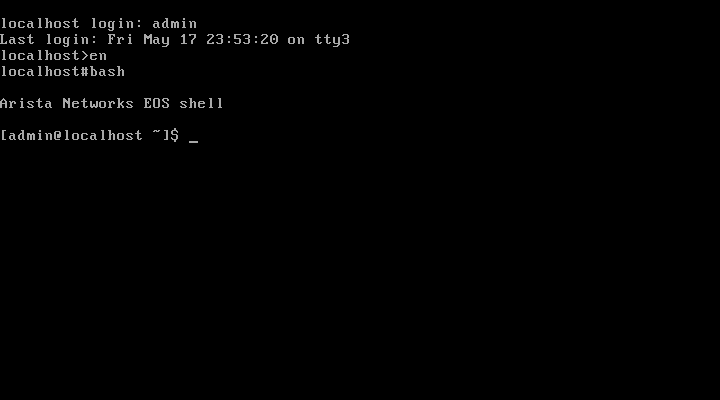
If everything works fine after you power on your Arista VM switch you should see the following window:


The most important commands at the beginning (as seen above):
 
admin # user name
en    # no pass is required 
bash  # get out of the arista cli to linux bash

As it follows the Cisco CLI behavior you can play with it by using Tab and '?' chars to explore available options.

References
  1. http://www.aristanetworks.com/en/support/gettingstarted
  2. http://www.aristanetworks.com/en/support/docs/eos
  3. http://www.aristanetworks.com/docs/Manuals/ConfigGuide.pdf

Sunday, April 14, 2013

How to enable IPMI settings in BIOS on Tyan S8225 motherboard

Often a server that supports IPMI supports as well remote KVM desktop like iKVM. The instruction below describe how to enable IPMI in BIOS for the Tyan S8225 motherboard.
  1. Connect keyboard and monitor to our system. Before we can mange our server remotely we need to first set things up using a standard method
  2. Get into BIOS


  3. Go to advance settings


  4. Set a fix IP for your IPMI console on the server


  5. Enable remote access


  6. Set a primary Video adapter to VGA if you have additional graphic card on broad 


  7. Save BIOS changes and start your server
  8. When the system boots you should see similar outputs


  9. From another PC try to connect to your remote IPMI session by typing http://192.168.0.200 in the browser

  10. The default user/password is root/superuser


  11. Open remote iKVM session and if necessary reboot the Tyan server 


  12. For better graphic results you can set this options in the JViewer

Howto start Ubuntu installation over IPMI session

A decent IPMI implementation comes not only with an iKVM  (KVM over IP) features but allows you as well to remotely mount local devices.

The software version available for mainboard Tyan S8225 support the following options from the JViewer terminal:


To start a remote installation from a downloaded ISO image all what you need to do is to mount it reboot t he system. Once the system starts it will try to boot from the ISO.

References

http://www.servethehome.com/tyan-ipmi-20-remote-management-webgui-tour/

Thursday, November 22, 2012

How to install Rackspace Private Cloud (Alamo) on a single physical server

Rackspace has released a new version of its private cloud offerings. The new private cloud is based on the lasted Folsom Openstack release and includes many of the latest features.

ISO downloading 

The software can be downloaded fro http://www.rackspace.com/cloud/private/openstack_software/ after you fill in a simple form. Once filled you receive an email with a direct link to download the ISO image (alamo-v2.0.0.iso). The other important link is Getting Started Guide document.

Supported features

In the guide we can find more details about supported and unsupported features.

Supported OpenStack Features:
  • Rackspace supports integration with the other components of OpenStack, as well as features such as floating IP address management, security groups, availability zones, and the python-novaclient command line client
  • Single and dual NIC configurations
  • NFS and ISCSI file storage as backing stores for VM storage
  • VNC Proxy
  • KVM hypervisor
  • Nova Multi Scheduler instead of Filter Scheduler
  • Keystone integrated authentication
  • Glance integrated image service
  • Horizon dashboard
  • Cinder block storage service
  • Swift object storage service
  • Linux and Windows guests to the extent to which they accept handoff from KVM and boot
  • Single metadata server running on each device
  • Cloud management through OpenStack APIs
  • Rackspace also supports the use of Rackspace Cloud Files as a backend for OpenStack
  • Image Storage. For information about OpenStack Object Storage, refer to Rackspace Private Cloud OpenStack Object Storage installation
Unsupported OpenStack Features. The following features are not supported yet.
  • Nova high availability
  • Nova object store
  • Nova volumes
  • NFS and ISCSI file storage via volumes for guest VMs
  • Clustered file system solutions
  • xpvnc
  • Xen and other hypervisors
  • Centralized metadata servers
  • Quantum Software Defined Networking
Installation

To start the installer I had to first convert the ISO into a bootable USB (In the guide you find a link to this tool that can help you with this task www.pendrivelinux.com)

Once done change the boot sequence in BIOS, plug your Pendrive and restart the server.

The installation is relatively simple. The couple of questions that you may get confused are about the number of NIC and what subnet do you want to use for the cloud servers.

Below are some of my screenshots to demonstrate how it looks like (sorry for the quality)

The installation welcome screen


There will be couple of questions for IP address, gateway, netmask, DNS, user, password that you have to answer as well. Random screenshots are showed below.


During the whole installation you can switch to console 4 (ALT+4) and observe various debugging logs as the installation progresses.


At some point the phase 1 of 2 will be completed and the system reboots. Once the system come back we can see different logs showing how the chef progress as Openstack is configured.


At the end of phase 2/2 when the installation is completed you are going to see a screen with summaries about the server resources.


References
  1. http://www.rackspace.com/cloud/private/openstack_software/
  2. http://www.rackspace.com/knowledge_center/article/installing-rackspace-private-cloud-on-physical-hardware

Wednesday, May 4, 2011

By using Ubuntu how to create a bootable USB thumb drive with Fedora distro

Although this it has already been possible to use USB thumb drive and boot from it for a longer time, there is still no one unified method to create this USB thumb drive.

Ubuntu has its own method:

"2) Burn your CD or create a USB drive"
http://www.ubuntu.com/download/server/download

Fedora has its own as well:

"3.2.1. Making Fedora USB Media on a Windows Operating System"
http://docs.fedoraproject.org/en-US/Fedora/14/html/Installation_Guide/Making_USB_Media.html

Fortunately for us a separate project unetbootin [1] comes in handy to do this job regardless what OS you are currently using.

To simply install and run follow this instructions bellow.

# aptitude install unetbootin 
# dpkg -L  unetbootin | grep bin
/usr/bin/unetbootin
# unetbootin


References:

[1]
UNetbootin - Homepage and Downloads

Using Fedora's liveusb-creator on Ubuntu Lucid Lynx

Sunday, May 1, 2011

Gdisk error message: Caution: invalid main GPT header, but valid backup; regenerating main header from backup!

At some point when experimenting with partitions on your disk you may get the following error message.

% gdisk /dev/sda
GPT fdisk (gdisk) version 0.7.1

Caution: invalid main GPT header, but valid backup; regenerating main header
from backup!

Caution! After loading partitions, the CRC doesn't check out!
Warning! Main partition table CRC mismatch! Loaded backup partition table
instead of main partition table!

Warning! One or more CRCs don't match. You should repair the disk!

Partition table scan:
  MBR: MBR only
  BSD: not present
  APM: not present
  GPT: damaged

Found valid MBR and corrupt GPT. Which do you want to use? (Using the
GPT MAY permit recovery of GPT data.)
 1 - MBR
 2 - GPT
 3 - Create blank GPT

As always you have to be very careful depending what you did and what do you want to do as next.

The three options for gdisk gives you the choice what partition tables you will examine. Fortunately for us gpart is not going to write on disk anything until we say so by executing the w (write) command (example bellow). The three options only influences how the data on the disk are going to be interpreted and presented for our review.

# gdisk /dev/sda
Command (? for help): h
b    back up GPT data to a file
c    change a partition's name
d    delete a partition
i    show detailed information on a partition
l    list known partition types
n    add a new partition
o    create a new empty GUID partition table (GPT)
p    print the partition table
q    quit without saving changes
r    recovery and transformation options (experts only)
s    sort partitions
t    change a partition's type code
v    verify disk
w    write table to disk and exit
x    extra functionality (experts only)
?    print this menu

At this stage it is save to experiment and have a look how the partition tables look like. Depending on your choise different partitions may be printed ('p') .

REMEMBER to always quit the session with the 'q' (quit) and never with 'w' otherwise your experiments will be permanently saved on the disk.

In my case this error was misleading and confusing only. I could verify that my current partition schema was not GPT at all but the good old MSDOS one [1]. At this stage I knew that 'gdisk' is not the tool I wanted to use and I finished creating new partitions with 'parted'. I didn't have to use gdisk at all.

The reason why I had some parts of GPT data on my disk is unknown. I can only suspect that it was created when I played with the Windows tool 'EasyBCD'.

I could try to delete the GPT data but base on [2] never had to do it.

References
[1] How to find what type of disk partition schema do I use (msdos, gpt)

[2] Wiping Out Old GPT Data

Sunday, April 24, 2011

How to create a bootable USB thumb drive for Windows 7 64bit using Windows XP 32bit machine.

Problem:
We have the ISO of the Windows 7 64bit and want to install it using the USB Thumb drive installation method.
We have access only to our old Windows XP 32bit OS.

Solution:
Use the standard MS tool to format the USB Thumb drive [1].
It will failed at the 100% with an error message saying:


Status: Files copied successfully. However, we were unable to run bootsect to make the USB device
bootable. If you need assistance with bootsect ....#truncated#


Download and install the EasyBCD for your WinXP 32bit [2].
The installation will copy the bootsect.exe tool that can be used on winXP.

Run the bootsect.exe to make the USB Thumb drive bootable. The 'E:' is the driver letter assign by your XP!

C:\Program Files\NeoSmart Technologies\EasyBCD\bin>bootsect.exe /nt60 E:
Target volumes will be updated with BOOTMGR compatible bootcode.

E: (\\?\Volume{ba063d8e-7111-11e0-b640-aafb6b9edf9e})

    Successfully updated NTFS filesystem bootcode.

Bootcode was successfully updated on all targeted volumes.

As last, unmount the USB, reboot the system, change the BIOS and start the installation.

References:

[1] Windows 7 USB/DVD Download Tool

[2] EasyBCD

For troubleshooting purposes:
How To Boot And Install Windows 7 From USB Flash Drive