Search This Blog

Showing posts with label virtualbox. Show all posts

Saturday, May 18, 2013

How to install Arista EOS on Virtualbox

The solid EOS architecture that makes Arista switches so powerful allow as well easy testing and experimenting. You don't need to buy any physical switch to get access to the CLI to play with it.

These links below are going to give you enough information how to deploy yours EOS-4.10.2-veos.vmdk switch image within Virtualbox or any other hypervisor. All what you need is to download 2 files (the EOS.vmdk and Aboot*.iso) and follow the steps.

vEOS and VirtualBox
VMWare Fusion Virtual Networks
Building a Virtual Lab with Arista vEOS and VirtualBox

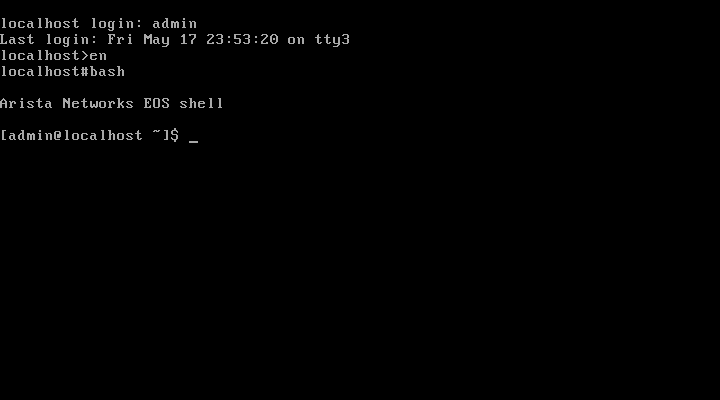
If everything works fine after you power on your Arista VM switch you should see the following window:


The most important commands at the beginning (as seen above):
 
admin # user name
en    # no pass is required 
bash  # get out of the arista cli to linux bash

As it follows the Cisco CLI behavior you can play with it by using Tab and '?' chars to explore available options.

References
  1. http://www.aristanetworks.com/en/support/gettingstarted
  2. http://www.aristanetworks.com/en/support/docs/eos
  3. http://www.aristanetworks.com/docs/Manuals/ConfigGuide.pdf

Tuesday, March 26, 2013

Installing VirtualBox Extension Pack drivers on Ubuntu 12.10 guest system

After successful upgrade of my VirtualBox and its Extension Pack here I decided to spin up a new local virtual machine and install Ubuntu 12.10. All went fine except that I had an issue installing the Guest additional drivers from the Extension Pack. Below are my notes and missing steps from the official guide (*) Chapter 4. Guest Additions that I had to do in my Ubuntu Desktop.

The default installation of Ubuntu for your desktop doesn't install dkms package. Following the (*) guide you will have to install it. 

Additionally you have to install your kernel source header files that 

apt-get install aptitude
aptitude install  linux-headers-3.5.0-26-generic

After this the driver instillation goes well. All what you need to do is now to restart your VM.
 
root@rado-VirtualBox:/media/rado/VBOXADDITIONS_4.2.10_84104# sh ./VBoxLinuxAdditions.run  uninstall
root@rado-VirtualBox:/media/rado/VBOXADDITIONS_4.2.10_84104# sh ./VBoxLinuxAdditions.run 
Verifying archive integrity... All good.
Uncompressing VirtualBox 4.2.10 Guest Additions for Linux..........
VirtualBox Guest Additions installer
Removing existing VirtualBox DKMS kernel modules ...done.
Removing existing VirtualBox non-DKMS kernel modules ...done.
Building the VirtualBox Guest Additions kernel modules ...done.
Doing non-kernel setup of the Guest Additions ...done.
Starting the VirtualBox Guest Additions ...done.
 Installing the Window System drivers
Installing X.Org Server 1.13 modules ...done.
Setting up the Window System to use the Guest Additions ...done.
You may need to restart the hal service and the Window System (or just restart
the guest system) to enable the Guest Additions.

Installing graphics libraries and desktop services components ...done.
VirtualBox upgrade error

I've decide to update my old version of VirtualBox on Windows 7. The installation of the software went fine but when I tried to update the  Extension Pack I run into this issue:
 
Failed to install the Extension Pack C:/Users/rado4752/.VirtualBox/Oracle_VM_VirtualBox_Extension_Pack-4.2.10.vbox-extpack.

The installer failed with exit code 1: VBoxExtPackHelperApp.exe: error: Failed to rename the extension pack directory: VERR_ALREADY_EXISTS

rcExit=1.

Result Code: E_FAIL (0x80004005)
Component: ExtPackManager
Interface: IExtPackManager {3295e6ce-b051-47b2-9514-2c588bfe7554}

As the error suggest this is most likely a file system security issue. As I don't have full Admin right on this host the solution for me was to clean and uninstall the old Extension Pack before trying to install the new one again (more info about it can be found here: https://forums.virtualbox.org/viewtopic.php?f=6&t=46861)
 
c:\Program Files\Oracle\VirtualBox>vboxmanage extpack cleanup
Successfully performed extension pack cleanup

# try to install the Extension Pack again
C:\Users\rado4752\.VirtualBox>Oracle_VM_VirtualBox_Extension_Pack-4.2.10.vbox-extpack

Friday, November 23, 2012

Installing Rackspace Private Cloud (Alamo) on a single virtual server using VMware Workstation

If you are looking for info about installation on a physical server you may like this article instead: How to install Rackspace Private Cloud (Alamo) on a single physical server

VMware Workstation

The Openstack installation within a virtual server is almost identical like on a physical one. The main difference is that we have to create a virtual machine that emulated/simulate the CPU extension needed for the nested hypervisor [1]

Practically that means that  you have to enable this box in your VM config.


If you prefere editing of a config file this is the variable that you have to set in *.vmx file
 
.encoding = "windows-1252"
config.version = "8"
virtualHW.version = "8"
numvcpus = "4"
vcpu.hotadd = "TRUE"
scsi0.present = "TRUE"
scsi0.virtualDev = "lsilogic"
memsize = "4096"
mem.hotadd = "TRUE"
scsi0:0.present = "TRUE"
scsi0:0.fileName = "Ubuntu 64-bit.vmdk"
ide1:0.present = "TRUE"
ide1:0.fileName = "C:\Users\radoslaw\Downloads\alamo-v2.0.0.iso"
ide1:0.deviceType = "cdrom-image"
floppy0.startConnected = "FALSE"
floppy0.fileName = ""
floppy0.autodetect = "TRUE"
ethernet0.present = "TRUE"
ethernet0.virtualDev = "e1000"
ethernet0.wakeOnPcktRcv = "FALSE"
ethernet0.addressType = "static"
ethernet0.address = "00:50:56:25:71:FB"
usb.present = "TRUE"
ehci.present = "TRUE"
sound.present = "TRUE"
sound.fileName = "-1"
sound.autodetect = "TRUE"
serial0.present = "TRUE"
serial0.fileType = "thinprint"
serial1.present = "TRUE"
serial1.fileType = "file"
serial1.fileName = "test.py"
pciBridge0.present = "TRUE"
pciBridge4.present = "TRUE"
pciBridge4.virtualDev = "pcieRootPort"
pciBridge4.functions = "8"
pciBridge5.present = "TRUE"
pciBridge5.virtualDev = "pcieRootPort"
pciBridge5.functions = "8"
pciBridge6.present = "TRUE"
pciBridge6.virtualDev = "pcieRootPort"
pciBridge6.functions = "8"
pciBridge7.present = "TRUE"
pciBridge7.virtualDev = "pcieRootPort"
pciBridge7.functions = "8"
vmci0.present = "TRUE"
hpet0.present = "TRUE"
usb.vbluetooth.startConnected = "TRUE"
displayName = "Ubuntu 64-bit"
guestOS = "ubuntu-64"
nvram = "Ubuntu 64-bit.nvram"
virtualHW.productCompatibility = "hosted"
vhv.enable = "TRUE"
powerType.powerOff = "hard"
powerType.powerOn = "hard"
powerType.suspend = "hard"
powerType.reset = "hard"
extendedConfigFile = "Ubuntu 64-bit.vmxf"
vmci0.id = "-1561829832"
uuid.location = "56 4d 22 7e ee b5 2b 19-3e c1 5e 76 a2 e8 5e 38"
uuid.bios = "56 4d 22 7e ee b5 2b 19-3e c1 5e 76 a2 e8 5e 38"
cleanShutdown = "TRUE"
replay.supported = "FALSE"
replay.filename = ""
scsi0:0.redo = ""
pciBridge0.pciSlotNumber = "17"
pciBridge4.pciSlotNumber = "21"
pciBridge5.pciSlotNumber = "22"
pciBridge6.pciSlotNumber = "23"
pciBridge7.pciSlotNumber = "24"
scsi0.pciSlotNumber = "16"
usb.pciSlotNumber = "32"
ethernet0.pciSlotNumber = "33"
sound.pciSlotNumber = "34"
ehci.pciSlotNumber = "35"
vmci0.pciSlotNumber = "36"
usb:1.present = "TRUE"
vmotion.checkpointFBSize = "37748736"
usb:1.speed = "2"
usb:1.deviceType = "hub"
usb:1.port = "1"
usb:1.parent = "-1"
tools.remindInstall = "TRUE"
usb:0.present = "TRUE"
usb:0.deviceType = "hid"
usb:0.port = "0"
usb:0.parent = "-1"

References
  1. Nested virtualization
    http://www.ibm.com/developerworks/cloud/library/cl-nestedvirtualization/ http://www.veeam.com/blog/nesting-hyper-v-with-vmware-workstation-8-and-esxi-5.html

    You can't use Oracle Virtual Box tool as it doesn't support nested virtualisation. https://www.virtualbox.org/ticket/4032

  2. http://www.rackspace.com/knowledge_center/article/installing-rackspace-private-cloud-vmware-fusion

Thursday, October 18, 2012

GNS3 doesn't list new VirtualBox Network Devices

Problem

GNS3 doesn't see any new Host-Only Ethernet Adapter created in VirtualBox.

Troubleshooting

We can verify and see that the new interfaces exists on the system.

C:\Users\user>netsh interface ipv4 show interfaces
Idx     Met         MTU          State                Name
---  ----------  ----------  ------------  ---------------------------
  1          50  4294967295  connected     Loopback Pseudo-Interface 1
 37          20        1500  connected     VirtualBox Host-Only Network #2
 21          20        1500  connected     VMware Network Adapter VMnet1
 22          20        1500  connected     VMware Network Adapter VMnet8
 24          20        1500  connected     VirtualBox Host-Only Network
 28          10        1500  connected     Local Area Connection 2
 45          20        1500  connected     VirtualBox Host-Only Network #3

The two above interfaces are missing and don't show in the GNS3 when trying add new VM. Because you don't see them on the GUI can't select them when trying to add a cloud VM to your network topology.

c:\Program Files\GNS3>"Network device list.cmd"

Network adapters on this machine:

NIO_gen_eth:\Device\NPF_{BAB3B416-5025-4142-A041-290EB05E7EA2}
 Name       : VMware Network Adapter VMnet8
 IP Address : 192.168.33.1
 Description: VMware Virtual Ethernet Adapter

NIO_gen_eth:\Device\NPF_{AA540984-A0AD-45BC-905F-C39E4A15010C}
 Name       : VirtualBox Host-Only Network
 IP Address : 192.168.56.1
 Description: Sun

NIO_gen_eth:\Device\NPF_{939368AC-34FE-47CB-9D4B-DC26D284D91E}
 Name       : VMware Network Adapter VMnet1
 IP Address : 192.168.91.1
 Description: VMware Virtual Ethernet Adapter

NIO_gen_eth:\Device\NPF_{991068D7-DDE1-45AB-B68F-24970ECA951B}
 Name       : Local Area Connection 2
 IP Address : 192.168.0.2
 Description: Marvell Yukon Ethernet Controller

Use as follows:
 F0/0 = NIO_gen_eth:\Device\NPF_{...}

Solution

This is Windows problem that doesn't propagate and advertise new virtual interfaces once created. The solution is to restart the Windows Service called 'NetGroup Packet Filter Driver'.

C:\Windows\system32>net stop npf
The NetGroup Packet Filter Driver service was stopped successfully.

C:\Windows\system32>net start npf
The NetGroup Packet Filter Driver service was started successfully.

References
  1. http://blog.ngocpham.info/blog/2010/04/13/howto-gns3-network-device-list-problem/
  2. http://forum.gns3.net/topic4878.html
  3. http://blog.stephendolphin.co.uk/quick-notes/quick-helpful-list-of-netsh-commands-for-your-windows-server-core-2008r2-installation/
  4. http://www.computerhope.com/netsh.htm

Saturday, August 4, 2012

How to change the action for Alt-Tab shortcut in VirtualBox and switch application windows running on your Windows 7 desktop rather than switching windows between the applications inside the VM only

Using multiple virtual mashines on your single desktop can be a little bit tricky when you need to change quickly focus between the various windows. In my practice I have offen a Windows 7 base desktop and run multiple VM's either using the VirtualBox or VMware Workstation

Problem

From the desktop in Windows 7 Alt+Tab switches between all the running application windows perfectly. Once in the single VM context the some combination switches windows of your VM application rather then all your origianl Windows application.

Solution

Use the host key . In VirtualBox by default, this is the right Control key on your keyboard. It changes the focus and once pressed any key pressed after is evaluated according to your host operating system and not the VM itself.

References
  1. http://ron.shoutboot.com/2010/09/11/alt-tab-out-of-virtualbox/
  2. http://pg-jottings.blogspot.co.uk/2011/05/host-key-and-virtual-box-how-to-alt-tab.html
  3. http://www.virtualbox.org/manual/ch01.html